This article is an introduction to embedded Android from the perspective of an embedded Linux developer.
If you are an embedded Linux developer but have never worked with embedded Android, this article is for you. If you develop or maintain Linux distros, and I want to start developing Android distros, this article is for you. If you are an Android application developer and want to understand a bit of how Android (internally) works, this article is also for you. And if you are just curious, this article is also for you! :-)
We will compare a GNU/Linux system with Android in different perspectives, from the build system to the partition layout, from the content of the rootfs to the architecture of the operating system components, from the IPC/RPC mechanism to how hardware access works. I hope you have fun!
Now, if you prefer a one hour talk instead of reading this article, you can also watch the talk “What Differs the Android Open Source Project from Other Linux Distributions?” presented at Embedded Linux Conference Europe 2020 (YouTube link).
Let’s start with a high-level overview…
The difference in a nutshell
If you look at the architecture of any embedded Linux system, you will always find the same main components:
- One or more bootloader(s) to bootstrap, configure the hardware and boot the Linux kernel.
- The Linux kernel.
- The root filesystem (rootfs) with the libraries and applications.
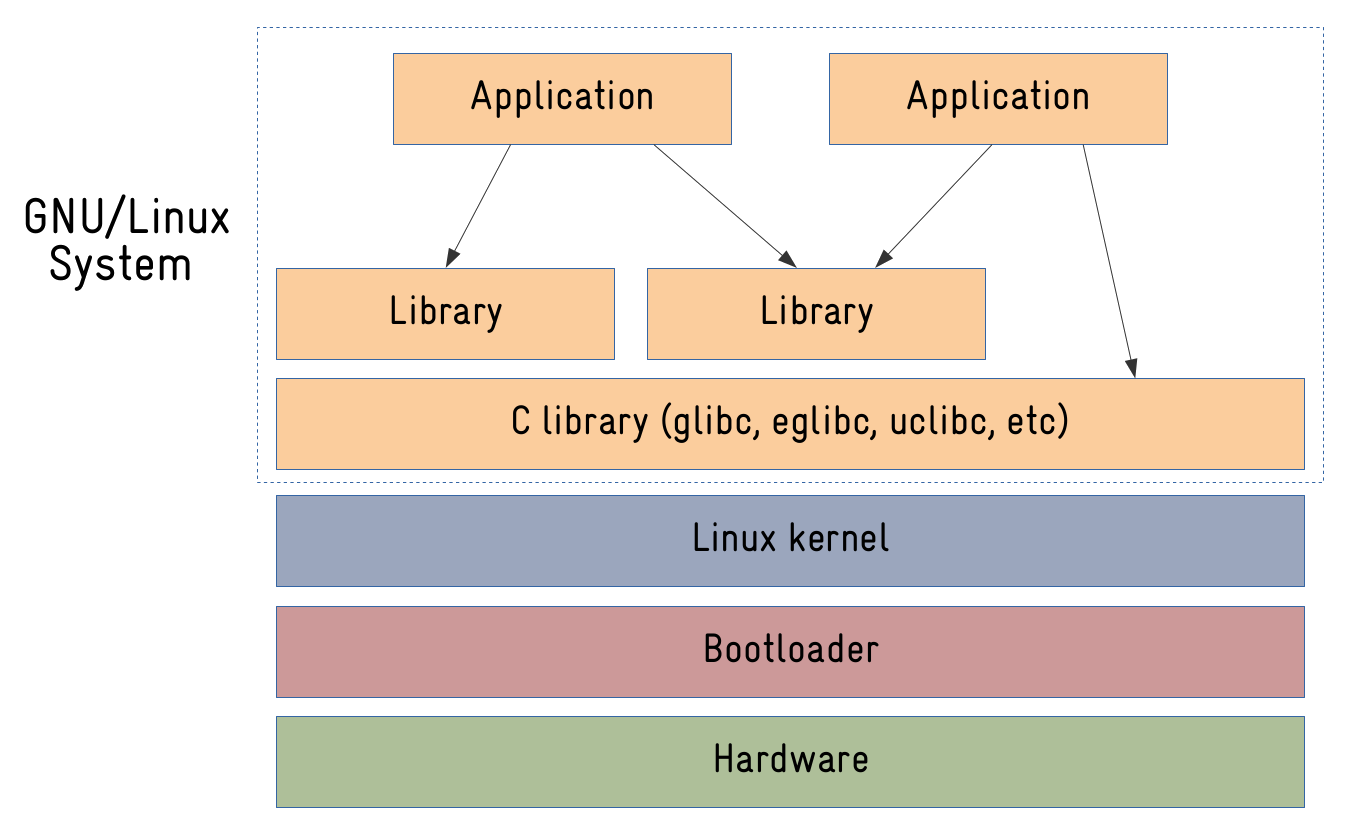
Now, if you look at the same diagram for an Android-based system, what would be the differences?
- The bootloader is there. Android doesn’t require anything special in the bootloader, although it is common for people to add support to fastboot, a protocol Google created for users and developers to interact with bootloaders on Android-based systems.
- The Linux kernel is also there, but with a “few” changes. More on that later.
- The root filesystem is also there. But it is REALLY different! Nothing like a typical root filesystem from Debian or a custom-built rootfs from Buildroot or OpenEmbedded.
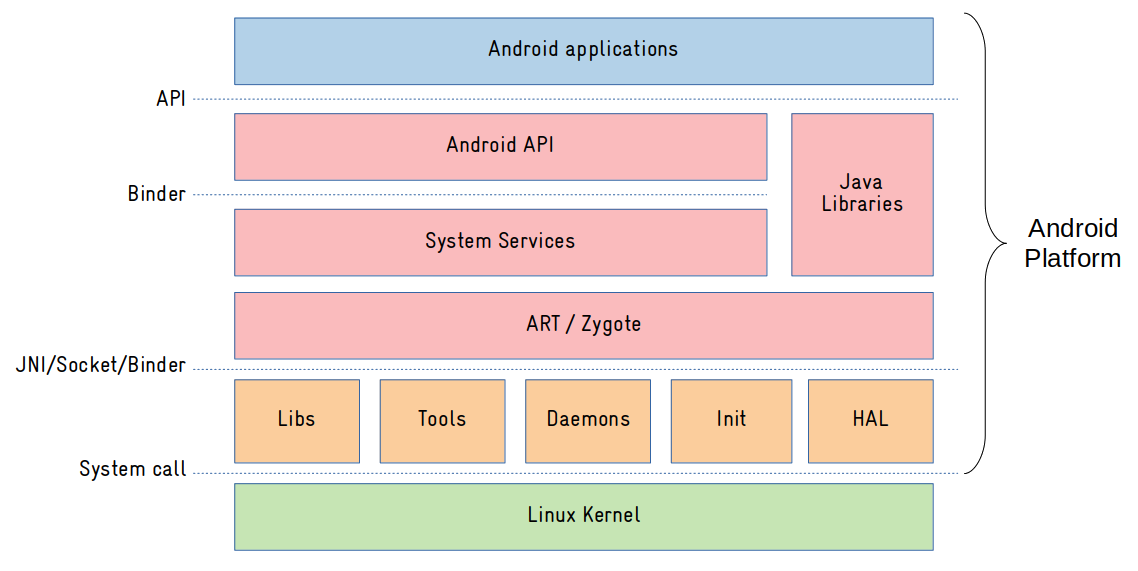
As we can see from the image above, Android userspace components are clearly divided in three main layers:
- Native: this is where all native (C/C++) applications and libraries resides. It is called native because it runs outside the ART Virtual Machine. The native layer basically serves the purpose of abstracting Linux kernel interfaces to the framework layer.
- Framework: this is where all operating system services are implemented (mostly in Java). Access to operating system resources are (remotely) exposed via components called system services, using an IPC/RPC mechanism called Binder. And an API will abstract the access to those system services for the applications.
- Application: Usually written in Java or Kotlin, they just see the exposed operating system API.
Before studying Android userspace components in details, let’s talk a little bit about the kernel.
Linux kernel
To run an Android-based system, we need a few extra “features” enabled in the Linux kernel. This article would be too long if I would try to go over most features, but I can comment on some:
- Binder: this is the IPC (Inter-Process Communication) and RPC (Remote Procedure Call) mechanism used in Android. You could do a rough comparition with DBUS, but DBUS runs in userspace, and Binder is a faster and lighter kernel-based implementation.
- Ashmem: the default shared memory allocator in Android (Google doesn’t like POSIX SHM).
- Low memory killer: a logic built on top of the kernel’s OOM (Out-of-Memory) killer, that in conjunction with a daemon (lmkd), helps to manage the system in low memory situations.
Most of those features are already available in the mainline kernel, but if you want the full list of “Androidisms”, you can clone Google’s kernel-common repository and search for commits starting with “ANDROID:”:
$ git clone https://android.googlesource.com/kernel/common kernel-common
$ git checkout remotes/origin/android11-5.4
$ git log --oneline | grep "ANDROID:" | less
5427f8b72fc0 ANDROID: GKI: update xiaomi symbol list
ecb88922f521 ANDROID: GKI: update Vivo symbol list
32b242337266 ANDROID: sysrq: add vendor hook for sysrq crash information
42e516f6b23b ANDROID: ABI: update allowed list for galaxy
de198b0f2d39 ANDROID: GKI: update Vivo symbol list

$ git log --oneline | grep "ANDROID:" | wc -l
1157
Despite these (and a few other) main changes in the Linux kernel, Android really differs from an GNU/Linux system in the userspace components and their architecture (the so-called Android platform), and the source-code for the Android platform is provided in a project called AOSP (Android Open Source Project).
AOSP
The AOSP is made of hundreds of repositories (specifically 780 in Android 11), and you can see all of them in https://android.googlesource.com/.
The source code is managed with known tools like repo and git, and it is huge! Android 11 is 100GB of source code plus 115GB after one build. So you really need a lot of disk space to work with the Android source code.
Cloning the latest AOSP source code is as simple as running the two commands below (-b can be used in repo init to clone an specific Android release tag or branch):
$ repo init -u https://android.googlesource.com/platform/manifest
$ repo sync
After a few hours, you will have the Android source code there in your machine:
$ ls
Android.bp      dalvik       libcore           read-snapshot.txt
art             developers   libnativehelper   sdk
bionic          development  Makefile          system
bootable        device       out               test
bootstrap.bash  external     packages          toolchain
build           frameworks   pdk               tools
compatibility   hardware     platform_testing
cts             kernel       prebuilts
As an open source project, there are several discussion groups to communicate with the community and the developers, and anyone can contribute to the project via the Gerrit code review tool.
The vast majority of software components are under the permissive Apache and BSD licenses, some software components are under GPL/LGPL licenses, and some Google applications are closed source (e.g. Google Play, Gmail, Google Maps, YouTube, etc). Those applications are available in a package called Google Mobile Services (GMS), and to obtain them, you need to certify the device via Android Compatibility Program (ACP).
When we download AOSP source code, we can see some differences when compared to other approaches for embedded Linux development.
Unlike ready-to-be-used distros (e.g. Debian), you can easily download the full source code and build the distro from scratch (if you want to create a custom Debian system for example, you usually do it from pre-compiled packages).
Comparing to build system approaches (e.g. Buildroot, OpenEmbedded), in Android it seems we have a “big application” downloaded with the repo sync command. Of course this is not true. We have thousands of projects and repositories there, that will compose in the end the operating system images. And the responsibility to put everything together rests with the Android build system…
Android build system
In previous Android versions, the build system was purely based on makefiles, where instructions for compiling each software component were defined in Android.mk files. Here is just an example of an Android.mk file to build a “Hello World” C application in Android:
|
|
The Makefile-based build system had several shortcomings, including low performance in incremental builds, and was replaced in the latest versions of Android by the Soong build system.
In the Soong build system, the rules for compiling software components are defined in Blueprint files (Android.bp), which have a syntax similar to JSON. Here is the same example of building a “Hello World” C application in Android, but using a Blueprint file:
cc_binary {
name: "helloworld",
srcs: ["helloworld.c"],
tags: ["optional"],
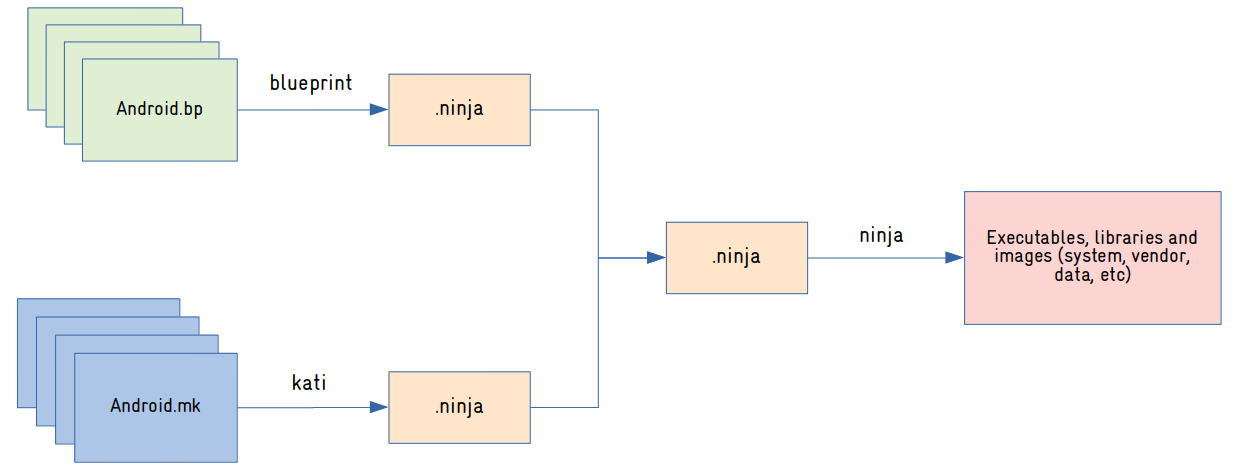
}Blueprint files are processed by a tool called Blueprint, which produces .ninja files with all the rules for compiling Android software components. The .ninja files are then processed by a tool called Ninja, which will compile all the software components and generate the Android images (more on the images later).
As of this writing, not all makefiles (Android.mk) were converted to Blueprint files (Android.bp). For this reason, there is a tool called kati, responsible for converting Android.mk files to .ninja files. Over time, all Android.mk files should gradually be converted to Android.bp, eliminating the need to use the kati tool in the Android build system.
The following diagram is a summary of the Android build process:
Building Android is very simple. You can do it with three simple commands: one to source a script that will initialize the environment, the second to select the target device (product-variant), and the last to start the build. The commands below will build Android for the emulator:
$ source build/envsetup.sh
$ lunch aosp_x86_64-eng
$ make
After a few hours, we have the images in out/target/product/:
$ cd out/target/product/generic_x86_64/ && ls *.img
cache.img          super_empty.img    vbmeta.img
dtb.img            super.img          vendor_boot-debug.img
encryptionkey.img  system.img         vendor_boot.img
ramdisk-debug.img  system-qemu.img    vendor.img
ramdisk.img        userdata.img       vendor-qemu.img
ramdisk-qemu.img   userdata-qemu.img
Now, what are all those images? How is the rootfs organized in Android?
Rootfs organization and partition layout
The rootfs organization on Linux systems is (mostly) standardized, basically defined by two standards: Filesystem Hierarchy Standard and Linux Standard Base.
Linux distributions try to conform to these standards, making the applications easily portable, and simplifying the life of users and developers when they need to work with different Linux systems.
But as you would expect, Android is an exception!
This is the listing of the root partition of an Android system (Android 11, built for QEMU). May I ask you where is /sbin, /usr, /lib and other common Linux system directories?
# ls /
acct d etc mnt sdcard
apex data init odm storage
bin data_mirror init.environ.rc oem sys
bugreports debug_ramdisk linkerconfig proc system
cache default.prop lost+found product system_ext
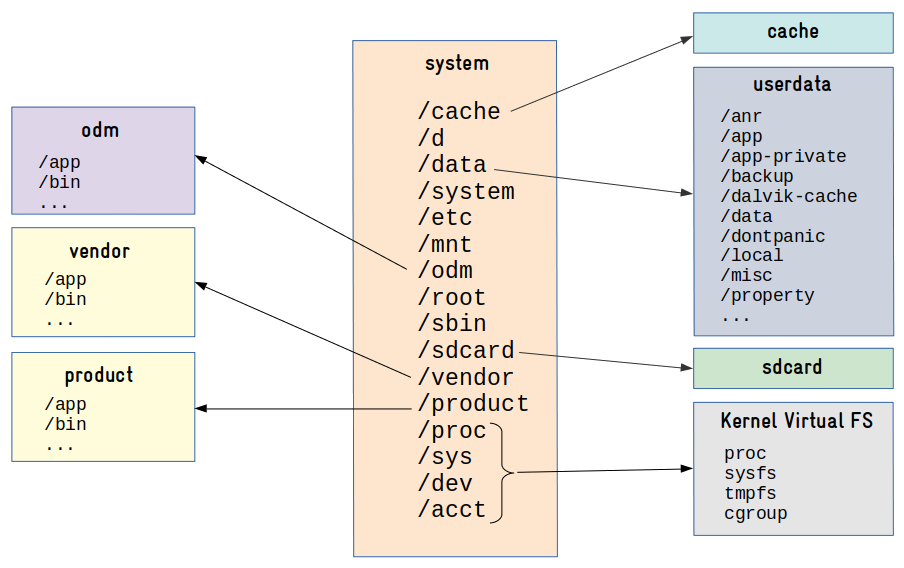
config dev metadata res vendorThey are not there! In Android, operating system components (applications, libraries) are located in the /system directory (mount point for the system partition), and user data/configuration (including applications installed at runtime) is located in the /data directory (mount point for the data partition). And there are many other partitions like cache (downloaded files and temporary data), vendor (specific files from the SoC manufacturer) and odm (specific files from the device manufacturer).
This is a basic overview of the partition layout on Android 11 (may vary depending on the manufacturer/device):
Very different from a typical embedded Linux system, right?
So now, why don’t we talk a little bit about the contents of the filesystem? Because they also differs, a lot. Let’s start with the C library.
Android C library
One of the main components of an operating system based on the Linux kernel is the C library.
The C library implements the operating system’s API, providing an interface for applications to access kernel services through system calls.
Several C libraries are available for Linux systems, including glibc, uclibc-ng and musl. But Android has its own C library: Bionic!
I can imagine at least three reasons that may have motivated Google to implement its own C library: license, speed and size. The implementation is really simple, lightweight and released under the BSD license.
One important thing to mention is that it doesn’t have full POSIX support, which can make it more difficult to build native Linux applications for Android.
See for example the code snippet below from libbb/missing_syscalls.c in BusyBox. The #if defined(ANDROID) was required since some Bionic functions do not follow the POSIX standard.
|
|
And talking about BusyBox…
Why doesn’t Android use BusyBox?
It is very common to use BusyBox on embedded Linux devices.
Busybox provides the (re)implementation of common tools and applications such as an init program, a shell and several utilities to manipulate and configure the system.
But Android does not ship with BusyBox by default!
Android uses two other (conceptually similar) implementations called Toolbox and Toybox, both released under a BSD license. Toolbox is a tool implemented by Google and Toybox is a tool implemented by the community (started by Rob Landley, BusyBox ex-maintainer).
And because these tools have some limitations, it is common to install BusyBox on an Android device, especially during development. One motivation would be to have a good text editor (vi) available in the command line.
Now, an essential part of a Linux-based operating system is the init system. And how does the initialization work in Android?
Android init system
In a nutshell, the init application is executed by the kernel right after mounting the rootfs, being responsible for system initialization and management.
There are several implementations of the init process for Linux systems, including sysvinit, systemd and upstart. And as you may already expect, Android has its own init system!
The Android init process has 3 primary responsibilities:
- Initialize and configure the operating system execution environment (export environment variables, create and set permissions on files and directories, create links, mount file systems, setup selinux, etc).
- Start and monitor daemons.
- Manage system properties.
The behavior of the init process is defined in a configuration file (/etc/init/hw/init.rc by default), and it’s very different from any init configuration file we are used to. Here is a snippet from the default Android init.rc file:
import /init.environ.rc
import /system/etc/init/hw/init.usb.rc
import /init.${ro.hardware}.rc
import /vendor/etc/init/hw/init.${ro.hardware}.rc
import /system/etc/init/hw/init.usb.configfs.rc
import /system/etc/init/hw/init.${ro.zygote}.rc

# Cgroups are mounted right before early-init using list from /etc/cgroups.json
on early-init
    # Disable sysrq from keyboard
    write /proc/sys/kernel/sysrq 0

    # Android doesn't need kernel module autoloading, and it causes SELinux
    # denials.  So disable it by setting modprobe to the empty string.  Note: to
    # explicitly set a sysctl to an empty string, a trailing newline is needed.
    write /proc/sys/kernel/modprobe \n

    ...

on init
    sysclktz 0

    # Mix device-specific information into the entropy pool
    copy /proc/cmdline /dev/urandom
    copy /system/etc/prop.default /dev/urandom

    symlink /proc/self/fd/0 /dev/stdin
    symlink /proc/self/fd/1 /dev/stdout
    symlink /proc/self/fd/2 /dev/stderr

    ...

# Mount filesystems and start core system services.
on late-init
    trigger early-fs

    # Mount fstab in init.{$device}.rc by mount_all command. Optional parameter
    # '--early' can be specified to skip entries with 'latemount'.
    # /system and /vendor must be mounted by the end of the fs stage,
    # while /data is optional.
    trigger fs

on property:ro.debuggable=1
    # Give writes to anyone for the trace folder on debug builds.
    # The folder is used to store method traces.
    chmod 0773 /data/misc/trace
    # Give reads to anyone for the window trace folder on debug builds.
    chmod 0775 /data/misc/wmtrace

service ueventd /system/bin/ueventd
    class core
    critical
    seclabel u:r:ueventd:s0
    shutdown critical

service console /system/bin/sh
    class core
    console
    disabled
    user shell
    group shell log readproc
    seclabel u:r:shell:s0
    setenv HOSTNAME console

...
It is indeed very different. You have declarations of actions (e.g. on init) and declarations of services (e.g. service console /system/bin/sh). When an action is triggered at boot time, let’s say early-init, the commands declared in that trigger will be executed.
There are a lot of details here, but we don’t have much space in this article to talk about it (we could actually have a full article on this). For now, let’s focus on an important piece of this puzzle, the daemons!
Android daemons
Daemons are processes that run in the background and are responsible for managing some system functionality. Most of them are executed at startup by the init process, and usually they run in the background for as long as the system is functional.
Daemons are normally used to control and centralize access to a system resource, and on Android, many daemons are an interface between the Android framework (Java code) and system resources (network, storage, energy, radio, logging, etc). Some examples:
- ueventd: responsible for managing the connection of hardware devices (device hotplugging). It is the equivalent of udev or mdev on GNU/Linux systems.
- vold: (volume daemon) is responsible for monitoring events from storage devices.
- rild: (radio interface layer daemon) manages communication with the modem chip (voice and data).
- netd: (network management service daemon) is responsible for managing network connections (Bluetooth, Wi-Fi, USB, etc). It is the equivalent of NetworkManager or connman on GNU/Linux systems.
- installd: (install daemon) is responsible for managing the installation of Android applications (* .apk) and their associated resources.
- lmkd: (low memory killer daemon) is responsible for managing the kernel low memory killer interface.
Here is a (mostly) complete list of daemons running on Android 11:
# ps -A
USER            PID   PPID     VSZ    RSS WCHAN            ADDR S NAME
root              1      0 10782796  9696 do_epoll_+          0 S init
root            122      1 10761204  7376 do_sys_po+          0 S ueventd
logd            145      1 10764228  7932 __x64_sys+          0 S logd
lmkd            146      1 10756496  2456 do_epoll_+          0 S lmkd
system          147      1 10759476  5016 do_epoll_+          0 S servicemanager
system          148      1 10761244  6488 do_epoll_+          0 S hwservicemanager
system          149      1 10759572  4028 do_epoll_+          0 S vndservicemanager
root            153      1 10770096  8732 binder_th+          0 S vold
tombstoned      250      1 10755388  2128 do_epoll_+          0 S tombstoned
statsd          266      1 10766140  4572 do_epoll_+          0 S statsd
root            267      1 10781776  9532 binder_th+          0 S netd
credstore       306      1 10764440  7296 binder_th+          0 S credstore
gpu_service     307      1 10762672  6804 binder_th+          0 S gpuservice
system          308      1 10873496 31972 do_epoll_+          0 S surfaceflinger
root            316      1 10756876  2656 do_sys_po+          0 S netmgr
root            318      1 10758880  3072 do_sys_po+          0 S wifi_forwarder
wifi            320      1 10759960  5464 do_select           0 S hostapd_nohidl
logd            326      1 10756544  3160 __skb_wai+          0 S logcat
root            352      1 10773084  6376 0                   0 S adbd
nobody          354      1 10757496  3164 do_sys_po+          0 S traced_probes
nobody          355      1 10757632  3464 do_sys_po+          0 S traced
cameraserver    356      1   58984  17240 binder_th+          0 S cameraserver
drm             357      1   25952   6512 binder_th+          0 S drmserver
incidentd       359      1 10761968  4992 do_epoll_+          0 S incidentd
root            360      1 10765704  6452 binder_th+          0 S installd
iorapd          361      1 10775424  9536 futex_wai+          0 S iorapd
keystore        362      1 10764916  7404 binder_th+          0 S keystore
root            366      1 10765596  5648 binder_th+          0 S storaged
...
Have you realized that almost all daemons are Android specific? Yes, they really are. Android is an operating system where almost all userspace components were built from scratch!
In particular, it is worth mentioning how logging works on Android, since it doesn’t use common logging Linux daemons like journald or rsyslog. So let’s talk about this now.
Android logging system
In Android, the log daemon (logd) is responsible for managing all operating system logs, from applications down to the framework and native applications.
Access to logs is done through sockets exported in /dev/socket/:
# ls /dev/socket/logd*
/dev/socket/logd  /dev/socket/logdr  /dev/socket/logdw
To read or write to the logs, it’s not necessary to directly access these sockets. For this, applications can use the liblog library. And in the terminal, the user can write to the logs with the log command, and read the logs using the logcat tool:
# logcat
...
10-14 13:36:51.722 771 934 D SmsNumberUtils: enter filterDestAddr. destAddr="[BajqU4K5_YhSYbs-7QUn0dOwcmI]"
10-14 13:36:51.723 771 934 D SmsNumberUtils: destAddr is not formatted.
10-14 13:36:51.723 771 934 D SmsNumberUtils: leave filterDestAddr, new destAddr="[BajqU4K5_YhSYbs-7QUn0dOwcmI]"
10-14 13:36:57.054 316 316 E netmgr : qemu_pipe_open_ns:62: Could not connect to the 'pipe:qemud:network' service:
10-14 13:36:57.054 316 316 E netmgr : Failed to open QEMU pipe 'qemud:network': Invalid argument
10-14 13:36:57.324 318 318 E wifi_forwarder: qemu_pipe_open_ns:62: Could not connect to the 'pipe:qemud:wififorward' service:
10-14 13:36:57.325 318 318 E wifi_forwarder: RemoteConnection failed to initialize: RemoteConnection failed to open pipe
...
10-14 14:37:45.408 494 1324 D WifiNl80211Manager: Scan result ready event
10-14 14:37:45.408 494 1324 D WifiNative: Scan result ready event
10-14 14:37:59.109 316 316 E netmgr : qemu_pipe_open_ns:62: Could not connect to the 'pipe:qemud:network' service:
10-14 14:37:59.109 316 316 E netmgr : Failed to open QEMU pipe 'qemud:network': Invalid argument
10-14 14:37:59.574 318 318 E wifi_forwarder: qemu_pipe_open_ns:62: Could not connect to the 'pipe:qemud:wififorward' service:
10-14 14:37:59.575 318 318 E wifi_forwarder: RemoteConnection failed to initialize: RemoteConnection failed to open pipe
10-14 14:38:00.003 642 642 D KeyguardClockSwitch: Updating clock: 238
10-14 14:38:59.127 316 316 E netmgr : qemu_pipe_open_ns:62: Could not connect to the 'pipe:qemud:network' service:
10-14 14:38:59.127 316 316 E netmgr : Failed to open QEMU pipe 'qemud:network': Invalid argument
10-14 14:38:59.585 318 318 E wifi_forwarder: qemu_pipe_open_ns:62: Could not connect to the 'pipe:qemud:wififorward' service:
10-14 14:38:59.585 318 318 E wifi_forwarder: RemoteConnection failed to initialize: RemoteConnection failed to open pipe
10-14 14:39:00.003 642 642 D KeyguardClockSwitch: Updating clock: 239
10-14 14:39:59.142 316 316 E netmgr : qemu_pipe_open_ns:62: Could not connect to the 'pipe:qemud:network' service:
10-14 14:39:59.142 316 316 E netmgr : Failed to open QEMU pipe 'qemud:network': Invalid argument
10-14 14:39:59.634 318 318 E wifi_forwarder: qemu_pipe_open_ns:62: Could not connect to the 'pipe:qemud:wififorward' service:
10-14 14:39:59.634 318 318 E wifi_forwarder: RemoteConnection failed to initialize: RemoteConnection failed to open pipe
10-14 14:40:00.006 642 642 D KeyguardClockSwitch: Updating clock: 240
...After several years working with Android, I can say that the Android logging system is pretty decent and very useful when developing in the platform.
And talking about development, when porting Android to an embedded device, writing code that will talk to the hardware is an important part of the process. So why don’t we talk now about how hardware access works in Android?
Hardware access and Android HAL
On an embedded Linux system, access to hardware devices is usually exposed to applications via entries in /dev or /sys. But on Android, we rely on an additional layer called HAL (Hardware Abstraction Layer) to abstract access to hardware devices.
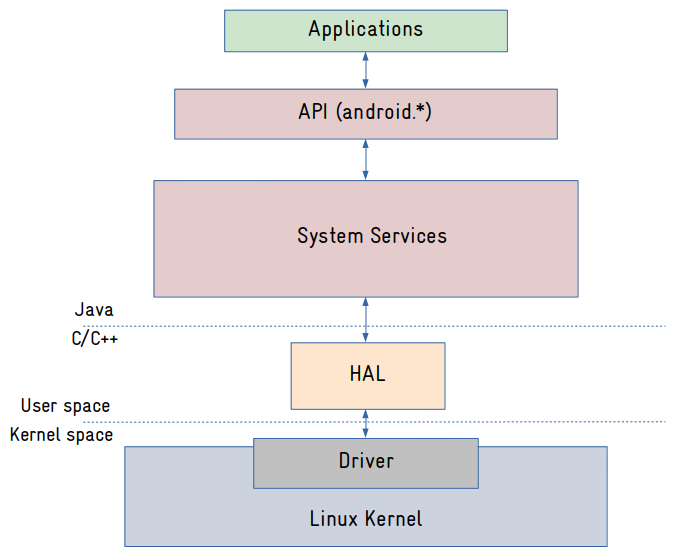
The main idea is to decouple the system services (more on it later) from the interfaces exposed by the Linux kernel, so if a kernel interface change, you have just to replace the HAL, and the system services will keep working. Most HALs are basically services running as a separated process that exposes an interface (declared in a language called HIDL) consumed via Binder. There are HAL definitions and implementations for most supported hardware devices in Android like displays, cameras, audio, sensors, etc.
But to completely understand the picture above, we have to talk about the Android framework and the system services.
Android framework and system services
So the Android framework is where all Java (and also now Kotlin) code are. We have there the system services and the APIs exposed to applications.
The system services in particular are a very important part of the Android operating system. They are basically objects that expose an interface (via Binder) to be consumed by other system services and applications (via API).
On an Android terminal, you can list the system services with the command below:
# service list
Found 184 services:
0 DockObserver: []
1 SurfaceFlinger: [android.ui.ISurfaceComposer]
2 accessibility: [android.view.accessibility.IAccessibilityManager]
3 account: [android.accounts.IAccountManager]
4 activity: [android.app.IActivityManager]
5 activity_task: [android.app.IActivityTaskManager]
6 adb: [android.debug.IAdbManager]
7 alarm: [android.app.IAlarmManager]
8 android.hardware.identity.IIdentityCredentialStore/default: [android.hardware.identity.IIdentityCredentialStore]
9 android.hardware.light.ILights/default: [android.hardware.light.ILights]
10 android.hardware.power.IPower/default: [android.hardware.power.IPower]
11 android.hardware.rebootescrow.IRebootEscrow/default: [android.hardware.rebootescrow.IRebootEscrow]
12 android.hardware.vibrator.IVibrator/default: [android.hardware.vibrator.IVibrator]
13 android.security.identity: [android.security.identity.ICredentialStoreFactory]
14 android.security.keystore: [android.security.keystore.IKeystoreService]
15 android.service.gatekeeper.IGateKeeperService: [android.service.gatekeeper.IGateKeeperService]
16 app_binding: []
17 app_integrity: [android.content.integrity.IAppIntegrityManager]
18 appops: [com.android.internal.app.IAppOpsService]
19 appwidget: [com.android.internal.appwidget.IAppWidgetService]
20 audio: [android.media.IAudioService]
21 auth: [android.hardware.biometrics.IAuthService]
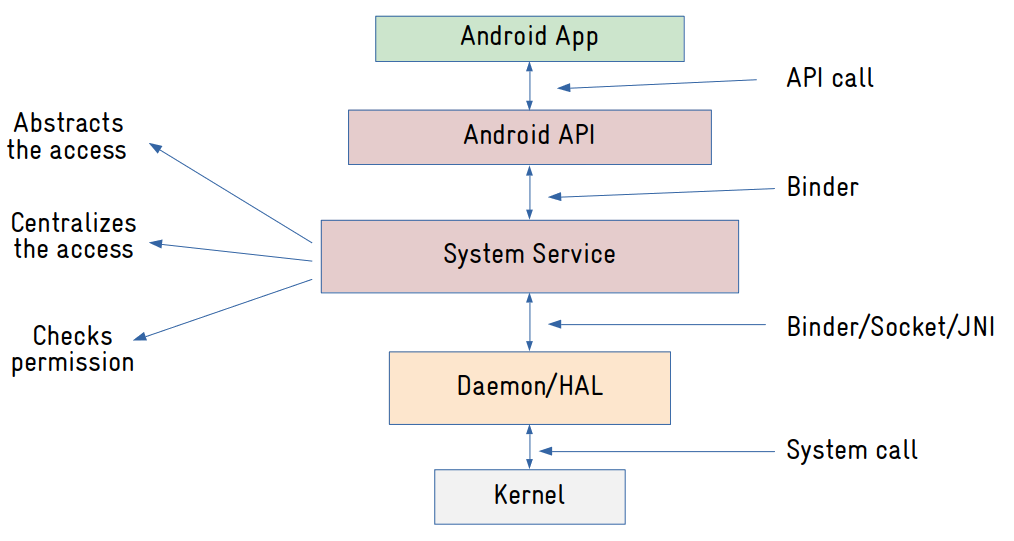
...Let’s say you are writing an Android application to read a sensor. This is what is going to happen:
- The application will call methods from the Android API (SensorManager) to request data from the sensor.
- The API (SensorManager) will send a message (via Binder) to a system service (in this case SensorService).
- The system service is responsible for managing the access to the resource it controls. In this example, the SensorService manages the access to sensors. And the first thing it will do is check for permissions: does the application has permission to access the sensors? If not, it will return an exception to the application. If access is granted, it will send a message via Binder to the HAL (Sensors HAL) to request data from the sensor.
- The Sensors HAL will read the sensor, probably via files exposed by a kernel IIO driver, and return the data to the system service (SensorService).
- The system service (SensorService) will return sensor data to the application.
Here is another diagram explaining how those components communicate with each other:
Now you see how Android really differs from a typical Linux system?
And we still need to talk about applications…
Android applications
One of the advantages of using Android on embedded devices is the well-defined set of APIs, which simplifies the development a lot and improves productivity significantly.
In Android, applications are written in Java or Kotlin using the Google SDK, and packaged in files with the .apk extension, which contains the compiled code, data and resources used by the application.
Android applications are basically composed of 4 types of components: activities, services, broadcast receivers and content providers. An application can contain one or more components, and one nice thing is that components can be reused and communicate with each other via a mechanism called intent.
In the end, even if we want to work with Android but don’t care about the operating system internal architecture, we still need to learn the Android paradigm, that again, differs a lot from usual Linux application development, let’s say in Qt or GTK.
Let’s wrap up now?
Is Android a Linux distribution or not?
We could see in this article that Android really differs from a typical GNU/Linux system, from the way we manage the source code and build the system, to the organization and components of the filesystem, and the modular architecture where all components communicate via IPC/RPC.
The only similarity we can clearly see is the usage of the Linux kernel. Almost everything else is different in Android.
So is Android a Linux distribution?
It depends on how you “classify” a Linux distribution. If a Linux distribution is any system that uses the Linux kernel, then we can probably say that Android is a Linux distribution. If a Linux distribution is a system that follows the same standards and shares some common components, like those provided by the GNU project, then Android is definitely not a Linux distribution.
It is important to mention that Android is evolving a lot over time. One of the main challenges that Google faces is software updates. They cannot update any device out there because it is not in their control.
Apple manufactures the SoC, the device itself (of course!) and the software, controlling almost every aspect of the supply chain. So they can update all devices in the field (at any time) if they want.
Now Google doesn’t have this ability. With the exception of Pixel devices, they don’t have much control over devices manufactured by other companies like Samsung or Xiaomi.
But they want this kind of control. And that is why they created projects to improve this situation, like Project Trebble, Generic System Images and Generic Kernel Image.
Many of the architectural designs we saw in this article came from those projects, and probably there will be more to come. If it’s for the better, only the users and the market will tell.
Please email your comments or questions to hello at sergioprado.blog, or sign up the newsletter to receive updates.