Do you know there is a dedicated partition in the eMMC called RPMB that makes it possible to store data with integrity and authenticity support?
RPMB was introduced in eMMC version 4.4, and since a lot of embedded Linux designs use eMMC nowadays, it’s probably available and ready for you to make use of it!
In this article, we will learn what the RPMB partition is and how it works, its main use cases, and how to access it on Linux. Have fun!
What is the RPMB partition?
RPMB (Replay Protected Memory Block) is a dedicated partition available on some flash-based storage devices (eMMC, UFS, NVMe, etc) that makes it possible to store and retrieve data with integrity and authenticity support.

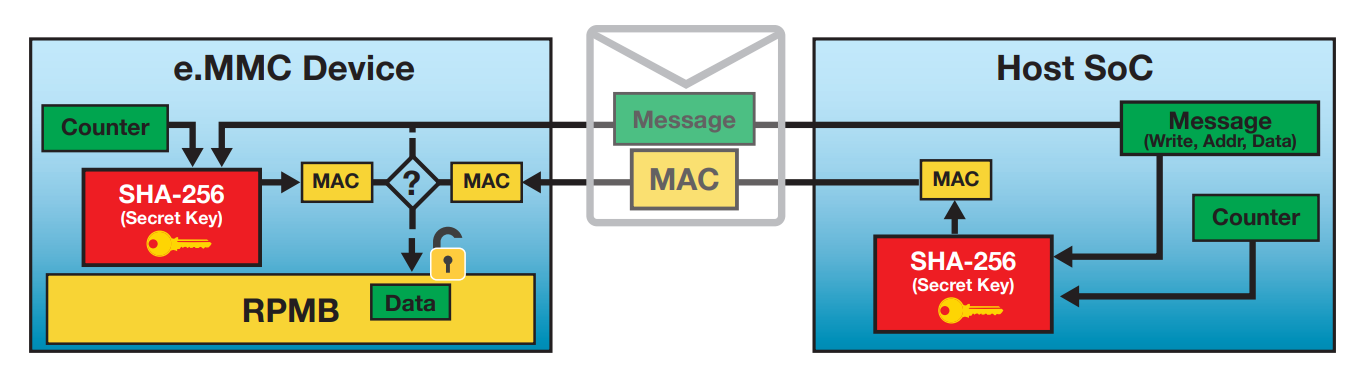
The RPMB interface is defined by the JEDEC organization and can be accessed with a specific and standardized security protocol that has its own commands and data structures.
It uses symmetric key authentication, where an authentication key is used by both the host (e.g. Linux OS) and the device (e.g. eMMC) to exchange authenticated data. In a nutshell, it works like this:
- An authentication key is first programmed by the host to the storage device (this must take place in a secure environment, usually on the production line).
- When writing to the device, the data is hashed and signed with the authentication key, and the storage device will only accept the write operation after checking the signature (this signature is also called message authentication code, or just MAC).
- When reading from the device, the data is returned together with the MAC. The host can also calculate the MAC and compare it with the one received to make sure the message is authentic.
We will learn more about this process later. For now, I want to focus on one important aspect of the RPMB partition, the “Replay Protected” part…
What is a replay attack?
A replay (or playback) attack occurs when a program copies data from a legitimate interaction involving two entities and then re-transmits the same data in a later stage.
As the original information contains the right sender and destination identifiers, as well as proof of data authenticity, the re-transmitted data will (if no measures are taken against the replay attack) be accepted, just as it was the first time it was transmitted.
For an example of a replay attack, think about a garage remote controller. When you click the button of the remote controller, a message is sent to the garage system, and the garage door opens.
What if a “man-in-the-middle” (MITM) is able to sniff the communication between the remote controller and the garage system? She might be able to resend (replay) the message later and, if no measures are taken against the replay attack, open the garage door!
So how to protect the system against a replay attack? We need to make sure that every message is unique.
In RPMB, a read-only counter is used at every write operation. This counter is incremented after every write operation and it is included in the calculation of the next MAC to be sent. So even if someone is able to intercept the write operation, replaying the same message would not work because it would require the re-calculation of the MAC with the new counter, and that can only be done by the one that has also the authentication key!
The replay attack protection is a very useful feature that makes the RPMB partition an interesting solution in different use cases.
RPMB use cases
One common use case of the RPMB partition is the authentication of software versions to prevent a downgrade attack.
Think about a scenario in which a manufacturer is able to remotely push software updates to a device:
- During an update, the software is written into the eMMC’s main area while the information about the version is stored in the RPMB.
- The manufacturer discovers that a software version has a security or safety bug.
- The manufacturer pushes a software update to fix the problem.
- The new software is written into the eMMC’s main area and version information is updated in the RPMB.
In this situation, a threat actor might try to sniff the communication and mimic the procedure used by the manufacturer to push the update, with the objective to downgrade the software and take advantage of the security or safety bug in the previous release.
This would be prevented by the RPMB partition. Since the threat actor doesn’t have the authentication key to update the software version in the RPMB partition, there is no way for an attacker to downgrade the software.
Along with encryption and hardware fuses, RPMB can also be used to build a trusted storage solution for a Trusted Execution Environment (TEE).
The RPMB partition can also be used as a generic storage location to write “permanent” or “preprogrammed” data on a system without any programmable ROM storage.
Other use cases might include fingerprint verification and user authentication, digital rights management (DRM), secure payments, etc.
Now let’s deep dive into how the RPMB partition works.
Deep dive into RPMB
RPMB is a small partition in the storage device with the following layout:
| Section | Access | Size |
|---|---|---|
| Authentication Key | Write once (not erasable or readable) | 32 bytes |
| Write Counter | Read-only | 4 bytes |
| RPBM Data Area | Read/write | Multiple of 128Kb |
The actual size of the data area depends on the implementation, but it must be a multiple of 128KB and a maximum of 16MB.
The RPMB protocol is documented in the JEDEC Standard No. 220.
There are four commands to interact with the RPMB partition:
- PROGRAM_KEY
- GET_WRITE_COUNTER
- WRITE
- READ
Let’s learn how these commands work in detail.
The PROGRAM_KEY command
To use the RPMB partition, we need to first program the authentication key via the PROGRAM_KEY command.
The authentication key is a 256-bit key programmed into the OTP (One-Time Programmable) area of the eMMC. It’s a secret key that can only be programmed once in the device lifetime, and it is invisible to any software after it is programmed.
This key needs to be created in a secure environment like in an OEM production, written to the RPMB device, and securely stored somewhere in the target platform.
That means some kind of secure storage is recommended for the properly usage of the RPMB partition. Example:
- A master key is generated and saved in a secure storage device (TPM, secure element, CAAM on iMX SoCs, etc).
- When the RPMB authentication key is generated, it is encrypted by this master key and stored somewhere in the eMMC.
- When access to the RPMB is required, the master key is used to decrypt the RPMB authentication key.
- For better security, these operations are usually carried out in a Trusted Execution Environment.
The GET_WRITE_COUNTER command
To write to the RPMB partition, the write counter is required and it can be obtained via the GET_WRITE_COUNTER command.
The write counter is a 4 bytes number, so it has a limit of 4.294.967.296 writes.
According to the specification, the value cannot be reset. After the counter has reached the maximum value, it will not be incremented anymore (overflow prevention).
The WRITE command
When executing the WRITE command, a MAC (message authentication code) is calculated using the HMAC SHA-256 algorithm, which takes as input:
- The message (data) itself.
- The authentication key.
- The write counter (for protection against replay attacks).
The resulting MAC is a 256-bit (32 bytes) cipher embedded in the RPMB data frame and sent together with the message.
When the storage device receives the write command, it verifies the authenticity of the command by checking that the counter was increased and the MAC that was sent by the host is identical to the MAC calculated by the device.
The READ command
When executing the READ command, the host will send the request together with a nonce (random number) for protection against replay attacks.
The device will return the data together with a MAC (message authentication code) calculated using the HMAC SHA-256 algorithm, taking as input:
- The message (data).
- The authentication key.
- The nonce sent by the host.
When receiving the data, it is up to the host to check the authenticity of the message by calculating the MAC and comparing it with the one returned by the device.
Without the RPMB key, read access is still possible, but the data being read might not be authentic (no guarantee of data integrity/authenticity and replay protection). That also means anyone can read the RPMB, so the RPMB doesn’t provide data confidentiality (encryption should be done by software if necessary).
Let’s have some hands-on now…
Accessing RPMB from Linux
In my tests, I’m using a Colibri iMX6 SoM from Toradex, running a mainline Linux kernel.
# cat /proc/device-tree/model
Toradex Colibri iMX6DL/S on Colibri Aster Board

# cat /proc/version
Linux version 6.2.0-rc3-labworks-00009-g49ed1130dcca (sprado@sprado-office) (arm-linux-gcc.br_real (Buildroot 2022.11) 11.3.0, GNU ld (GNU Binutils) 2.38) #9 SMP Sat Jun  3 10:39:09 -03 2023
Linux mainline already has built-in support for RPMB on a few storage subsystems, including UFS and MMC.
If you have a target platform with an eMMC storage device, you can check if there is an RPMB partition available by searching for the raw_rpmb_size_mult file at /sys:
# find /sys -name raw_rpmb_size_mult 2>&-
/sys/devices/platform/soc/2100000.bus/2198000.mmc/mmc_host/mmc2/mmc2:0001/raw_rpmb_size_mult

# cat /sys/devices/platform/soc/2100000.bus/2198000.mmc/mmc_host/mmc2/mmc2:0001/raw_rpmb_size_mult
0x20
In this example, the mmc2 storage device has an RPMB partition with 4Mb in size (0x20 * 128Kb).
The RPMB partition can be accessed via a block device:
# ls /dev/mmcblk2rpmbTo access the RPMB partition, we can use the mmc command from the mmc-utils package. This command has a rpmb sub-command to communicate with the RPMB partition:
# mmc -h
Usage:
...
mmc rpmb write-key <rpmb device> <key file>
                Program authentication key which is 32 bytes length and stored
                in the specified file. Also you can specify '-' instead of
                key file path to read the key from stdin.
                NOTE!  This is a one-time programmable (unreversible) change.
                Example:
                  $ echo -n AAAABBBBCCCCDDDDEEEEFFFFGGGGHHHH | \
                    mmc rpmb write-key /dev/mmcblk0rpmb -
        mmc rpmb read-counter <rpmb device>
                Counter value for the <rpmb device> will be read to stdout.
        mmc rpmb read-block <rpmb device> <address> <blocks count> <output file> [key file]
                Blocks of 256 bytes will be read from <rpmb device> to output
                file or stdout if '-' is specified. If key is specified - read
                data will be verified. Instead of regular path you can specify
                '-' to read key from stdin.
                Example:
                  $ echo -n AAAABBBBCCCCDDDDEEEEFFFFGGGGHHHH | \
                    mmc rpmb read-block /dev/mmcblk0rpmb 0x02 2 /tmp/block -
                or read two blocks without verification
                  $ mmc rpmb read-block /dev/mmcblk0rpmb 0x02 2 /tmp/block
        mmc rpmb write-block <rpmb device> <address> <256 byte data file> <key file>
                Block of 256 bytes will be written from data file to
                <rpmb device>. Also you can specify '-' instead of key
                file path or data file to read the data from stdin.
                Example:
                  $ (awk 'BEGIN {while (c++<256) printf "a"}' | \
                    echo -n AAAABBBBCCCCDDDDEEEEFFFFGGGGHHHH) | \
                    mmc rpmb write-block /dev/mmcblk0rpmb 0x02 - -
...
The first step to access the RPM partition is to write the key.
For testing purposes, let’s create the key with OpenSSL and store it in a file. But remember that this key should be kept in a secure storage device to leverage the security features of the RPMB partition.
# openssl rand 32 > keyNow we can write the key to the RPMB partition. Be aware that this is a one-time operation!
# mmc rpmb write-key /dev/mmcblk2rpmb keyNow we can read the write counter, which should start at zero since we have just configured the key:
# mmc rpmb read-counter /dev/mmcblk2rpmb
Counter value: 0x00000000
Let’s write some data to the device.
Writes are done by the mmc command in blocks of 256 bytes. So let’s create a data file with 256 bytes in size using the contents of the /proc/version file.
# dd if=/proc/version of=data bs=256 count=1 conv=syncNow we can write the data. Let’s write it to the beginning of the RPMB partition:
# mmc rpmb write-block /dev/mmcblk2rpmb 0 data keyAfter writing the data, we can confirm that the write counter was incremented:
# mmc rpmb read-counter /dev/mmcblk2rpmb
Counter value: 0x00000001
We can read from the device and confirm that the data has been written successfully (by passing the key, the authenticity is also checked):
# mmc rpmb read-block /dev/mmcblk2rpmb 0 1 - key
Linux version 6.2.0-rc3-labworks-00009-g49ed1130dcca (sprado@sprado-office) (arm-linux-gcc.br_real (Buildroot 2022.11) 11.3.0, GNU ld (GNU Binutils) 2.38) #9 SMP Sat Jun  3 10:39:09 -03 2023
Reading also works without passing the key. In this case, there is no guarantee of the integrity and authenticity of the returned data:
# mmc rpmb read-block /dev/mmcblk2rpmb 0 1 -
Linux version 6.2.0-rc3-labworks-00009-g49ed1130dcca (sprado@sprado-office) (arm-linux-gcc.br_real (Buildroot 2022.11) 11.3.0, GNU ld (GNU Binutils) 2.38) #9 SMP Sat Jun  3 10:39:09 -03 2023
What if we try to read using the wrong key? As expected, the authentication code will not match and the read will fail!
# openssl rand 32 > wrong-key
# mmc rpmb read-block /dev/mmcblk2rpmb 0 1 - wrong-key
RPMB MAC missmatch
Doing all of these operations on Linux might expose an attack surface for threat actors because the authentication key is exposed for the RPMB operations to be executed. That is why usually a Trusted Execution Environment (TEE) claims ownership of the RPMB partition, so these operations can be carried out in a secure environment.
In the end, RPMB is another layer to mitigate risks and improve the security of embedded Linux devices, and it’s always useful to know how it works and have it in our utility belt to make use of it when designing secure and connected devices.
Please email your comments or questions to hello at sergioprado.blog, or sign up the newsletter to receive updates.