This article is going to be an introduction to embedded Linux security.
Since this topic is quite extensive, I divided into two parts. In this first part, we will have a small introduction to security concepts and threat modeling and then focus on some mitigation techniques to improve the security of an embedded Linux device, including secure boot, code/data encryption and secure key storage.
If you prefer a one hour talk instead of reading this article, you can also watch the webinar “Introduction to embedded Linux security” I recorded for Toradex. I also gave the same talk at Embedded Linux Conference North America 2020, but as I write this article it was not yet published on YouTube.
Let’s first start with some concepts…
Security concepts
Security is all about risk mitigation.
On the one hand, we have owners, those who benefit from a product or service (user, manufacturer, business owner, etc). And owners want to protect assets, anything that has some value in the product or service (data, code, reputation, etc).
On the other hand, we have threat actors, a person or thing (malicious hacker, government, etc) that can manifest a threat, anything that is capable of acting against an asset in a manner that can result in harm.
To manifest a threat, the threat actor will explore vulnerabilities (weakness in the system) via an attack vector, a method or pathway used by the threat actor to access or penetrate the target system.
The diagram below express very well all those concepts:
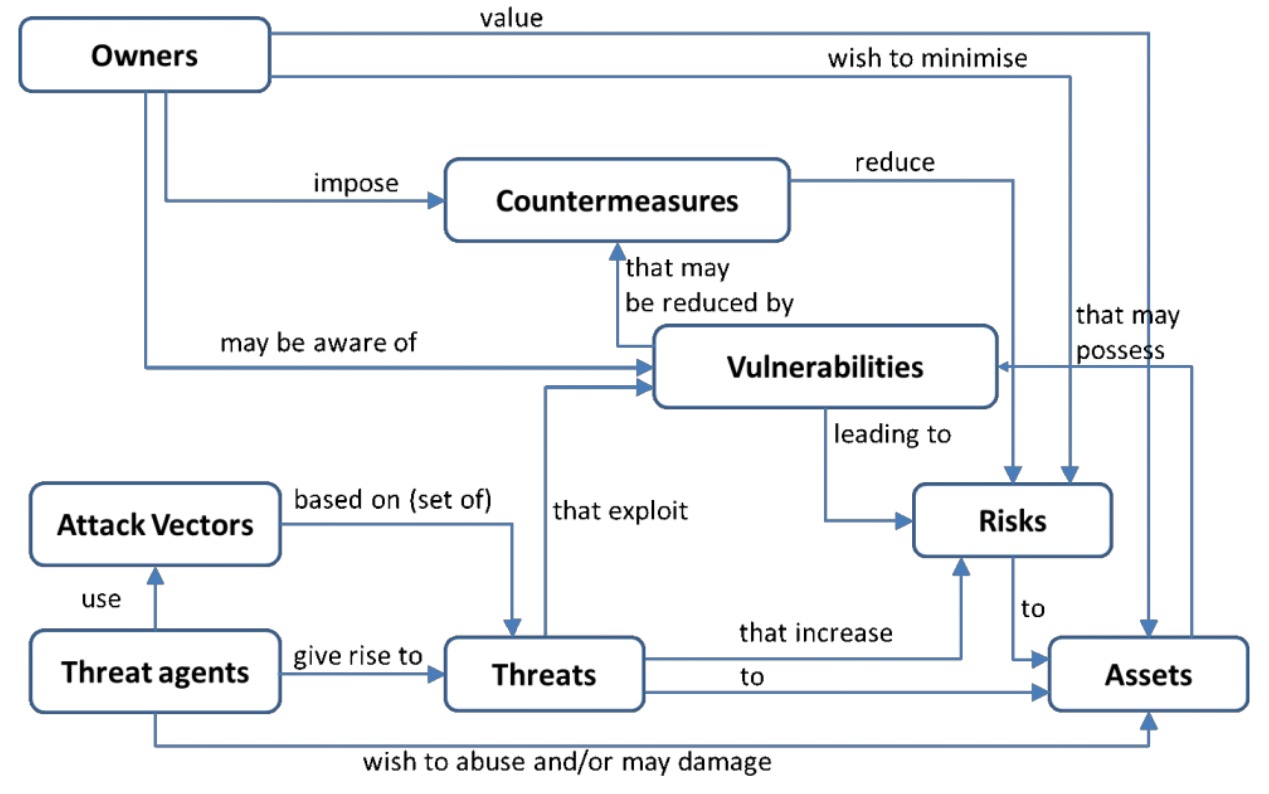
In the end, is a cat-and-mouse game between owners and threat actors. How far will the owner go to protect the assets? How far will the threat actor go to compromise the assets? It really depends on the value of the assets. Indeed, the perception of value may not be the same for owners and threat actors.
Identifying assets (and their value) to mitigate the risks of being compromised can be done in a process called threat modeling.
Threat modeling
Threat modeling is a process where potential threats can be identified, enumerated, and mitigations can be prioritized. It is basically a risk assessment process where you evaluate the value of your assets and the cost to protect them. The result of a threat modeling is the threat model of your product.
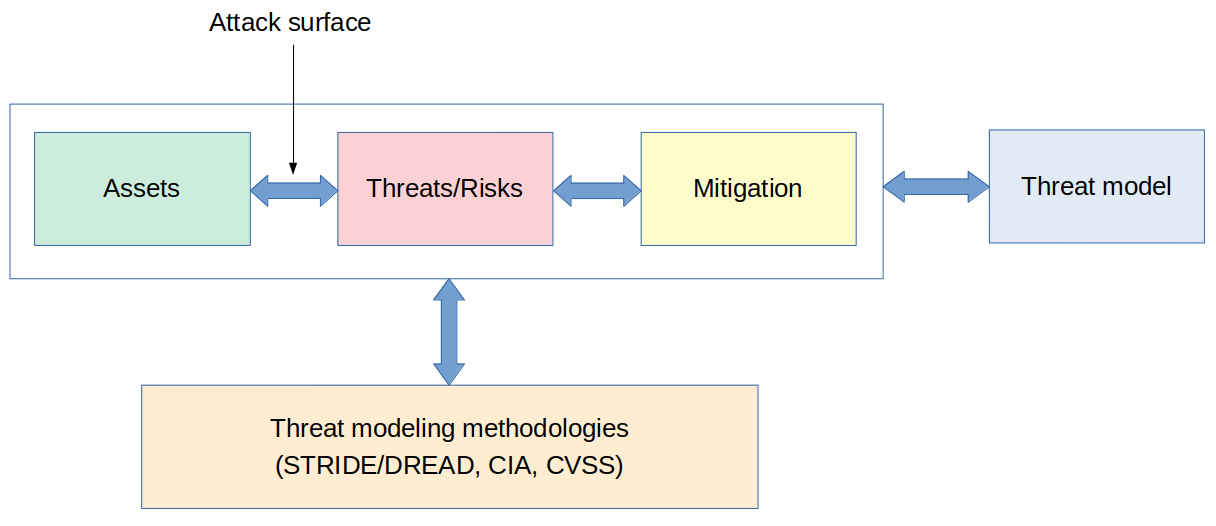
There are several techniques and methodologies that can help during threat modeling, including STRIDE, DREAD, VAST, OCTAVE, and many others.
To have a very basic introduction to the topic, let’s talk about STRIDE and DREAD.
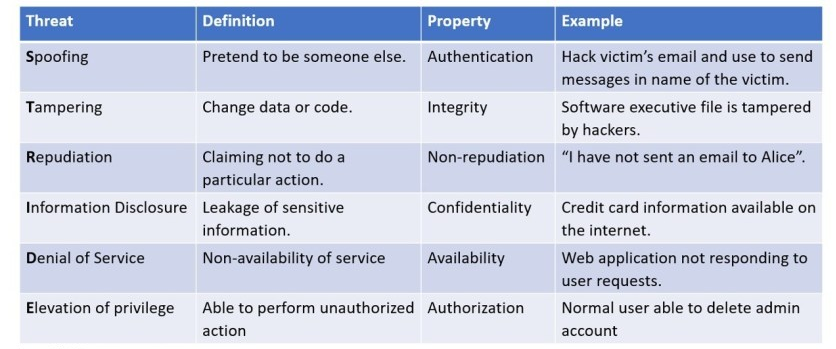
The STRIDE model is a very useful tool to help classify threats. It was developed by Microsoft and the name is an acronym for the six main types of threats: Spoofing, Tampering, Repudiation, Information disclosure, Denial of service and Escalation of privileges. STRIDE can be used to identify all threats the assets of a system could be exposed to.
The DREAD methodology is a tool for risk-assessing computer security threats. The name is an acronym for five categories of security threats: Damage (how bad would an attack be), Reproducibility (how easy is it to reproduce the attack), Exploitability (how much work is it to launch the attack), Affected users (how many people would be impacted) and Discoverability (how easy is it to discover the threat).
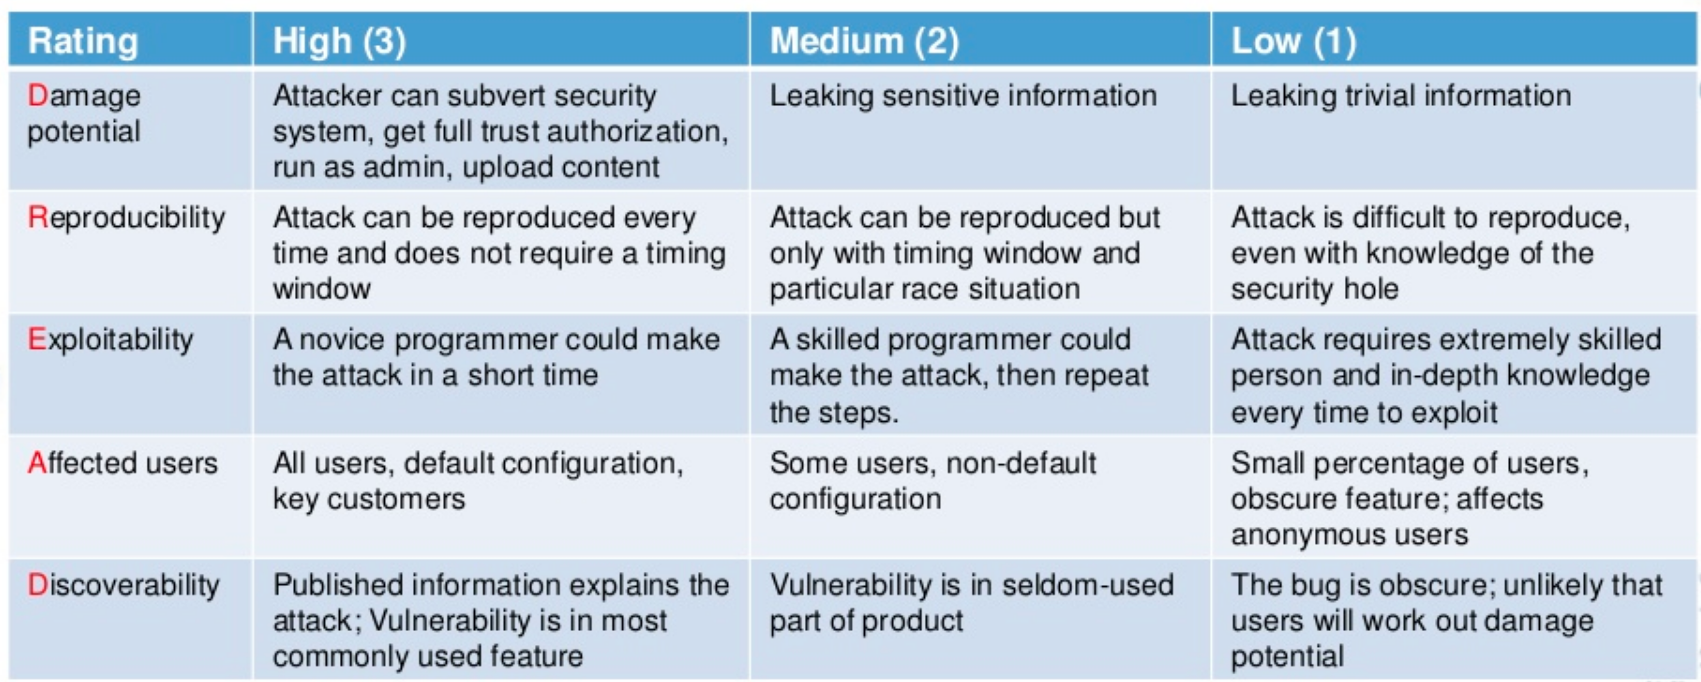
While the STRIDE model helps to identify the threats, the DREAD methodology helps to rank them. For each threat in the system, you would go over each threat category and classify it in low (1 point), medium (2 points), or high (3 points). In the end, you would have a ranked list of threats and mitigation strategies. Example:
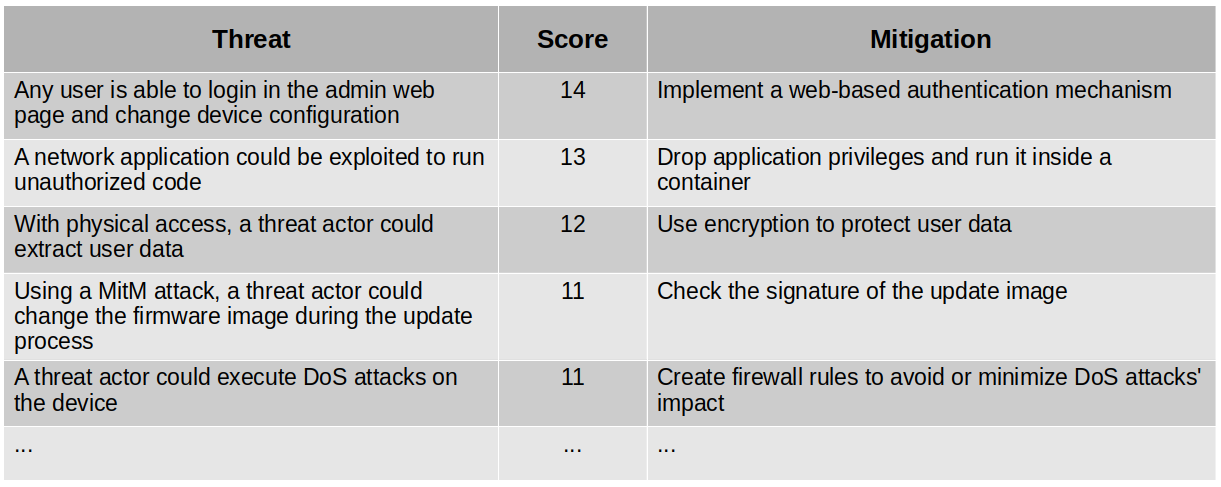
We can see that threat modeling will provide a very clear view of what we want to protect, how we plan to protect it, and associated costs. This is part of the threat model of the product, which needs to be re-evaluated for every development cycle. As a result, the threat model will provide a prioritized list of threats to work on, so we can focus on implementing the mitigations to improve the security of the product.
How to protect the integrity and authenticity of your code? How to ensure the privacy of the data? Where to store cryptographic keys? How to minimize the risks of an application to be exploited? Let’s try to answer all of those questions and many more, starting with secure boot!
Secure Boot
How to make sure the code you are running was built by a trustworthy person or company? Implementing a secure boot process.
The objective of a secure boot process is to protect the integrity and authenticity of the code.
Secure boot is usually based on the verification of digital signatures. An embedded Linux system normally has three major components: bootloader, kernel and root filesystem (rootfs). All these components are signed and the signatures are checked during boot.
For example, some hardware mechanism can be used to check the signature of the bootloader, that will check the signature of the kernel, that will use a ramdisk image to check the signature of the root filesystem. Since we have one component checking the signature of the next one in the boot chain, this process is often called a chain-of-trust.

Let’s take a look at a real example on an NXP iMX6 device.
Everything starts in the ROM code inside the SoC. On NXP iMX6, there is a hardware component called High Assurance Boot (HAB) that it is able to validate the signature of the first stage bootloader, making it possible to implement a secure boot process. The High Assurance Boot inside iMX6 devices can also be called the Root of Trust, since if it is compromised, all the secure boot process is also compromised.
The ROM code inside the iMX6 SoC, using the HAB component, will check the signature of the bootloader. For that, it is necessary to generate a pair of keys (public and private), sign the bootloader with the private key and store the public key inside the SoC. On iMX6, OTP fuses are used to store the keys. Actually, to make it less expensive, only the hash of the public key is stored in the SoC.
When the bootloader boots (e.g. U-Boot), it will have to check the signature of the Linux kernel. For that, it is common to use an image format called FIT image. The FIT image is a container for multiple binaries with hashing and signature support, and usually contains the Linux kernel image, device tree files and an initial ramdisk. After generating a pair of keys, we need to sign the binaries inside the FIT image with the private key e configure U-Boot to use the public key to check the signature of the FIT image.
After the kernel boots, it will run the init program from the ramdisk image. The ramdisk will have the logic to verify the integrity of the final root filesystem before mounting it. There are some options to implement this. One common option is using the device-mapper verity (dm-verity) kernel module. The dm-verity kernel module provides integrity checking of block devices and requires a read-only rootfs (squashfs can be a good solution). Other approaches would be IMA or dm-integrity if you want a read-write root filesystem.
Here is a diagram of the complete secure boot process:
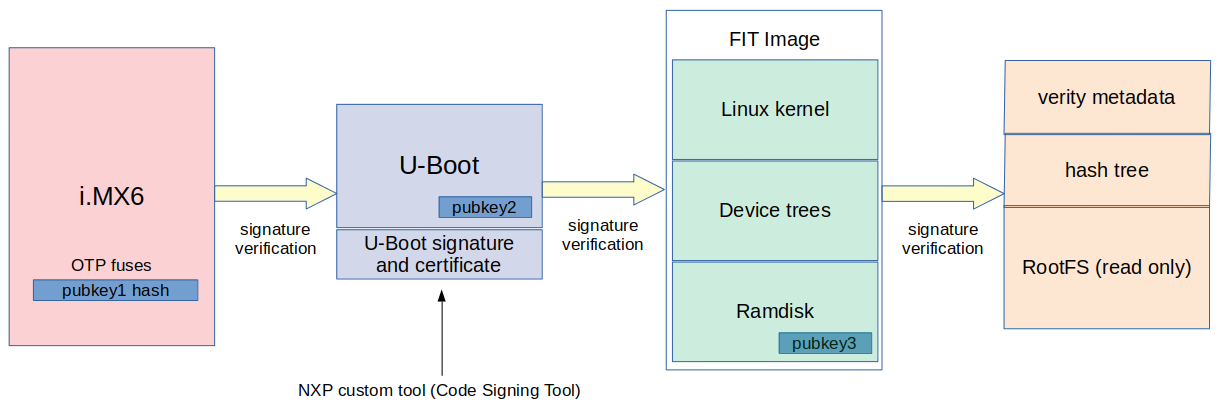
This is only one example of a secure boot implementation, although it could be applied to a different set of boards and ARM SoCs.
Yet nothing is 100% secure!
Secure boot vulnerabilities in the ROM code of several NXP devices (i.MX6, i.MX50, i.MX53, i.MX7, i.MX28 and Vybrid families) were publicly disclosed on July 17th, 2017. And if your chain of trust is compromised, everything is compromised! So we need to be aware of these types of vulnerabilities (in this case, they were fixed with new silicon).
While secure boot ensures authenticity and integrity, it does not protect the device from being counterfeited or threat actors from extracting code/data from the device. So if you want to protect your intellectual property or ensure data confidentiality, you will need to use encryption.
Code and data encryption
You may want to encrypt data or code in an embedded Linux device.
Data encryption is a common approach when you need to protect the privacy and confidentiality of the users. Data is any information generated during the executing of the device, including databases, configuration files, and so on.
Code encryption depends on the situation, and encrypting the full root filesystem is not that common. Usually, most of the components are free and open source software, so there is nothing to hide. There is also the issue of GPLv3 and Tivoization (using any GPLv3 software will force you to provide a mechanism for the user to update the software, and that would make it more difficult if you are encrypting it). A more common use case is to encrypt only the applications you developed for the device. It’s usually where your intellectual property is.
There are basically two main approaches to encryption in Linux: full disk encryption and file-based encryption.
Full disk encryption provides encryption at the block level and the whole disk or a disk partition is encrypted. For that, we can use dm-crypt, the Linux kernel’s device mapper crypto target.
File-based encryption provides encryption at the file system level, where each directory may be separately and optionally encrypted with a different key. The two most common implementations of file-based encryption are fscrypt and eCryptFS. fscrypt is an API available on some filesystems like EXT4, UBIFS and F2FS, and eCryptFS is a more generic solution implemented as a layer that stacks on top of an existing filesystem.
But what about the keys used for encryption?
Encryption keys
Since an asymmetric key algorithm is too slow to be used in encryption, usually a symmetric-key algorithm is used in encryption. That means the same key is used for encryption and decryption, and the key should be available somewhere in the filesystem so the encrypted code/data can be decrypted.
But we can’t just leave the key lying around in the filesystem, right?
There are several cases where companies didn’t care about this and have paid the price. For example, the image below is from the first Xbox video game console. Andrew “bunnie” Huang, a security researcher, was able to develop a specialized FPGA hardware to sniff the communication bus and extract the encryption keys from the device. Only because the keys were there, traveling in clear text in the communication bus, without any protection (by the way, Andrew Huang is the author of a very good book on hardware hacking called “Hacking the Xbox” that you can download it for free on his website).
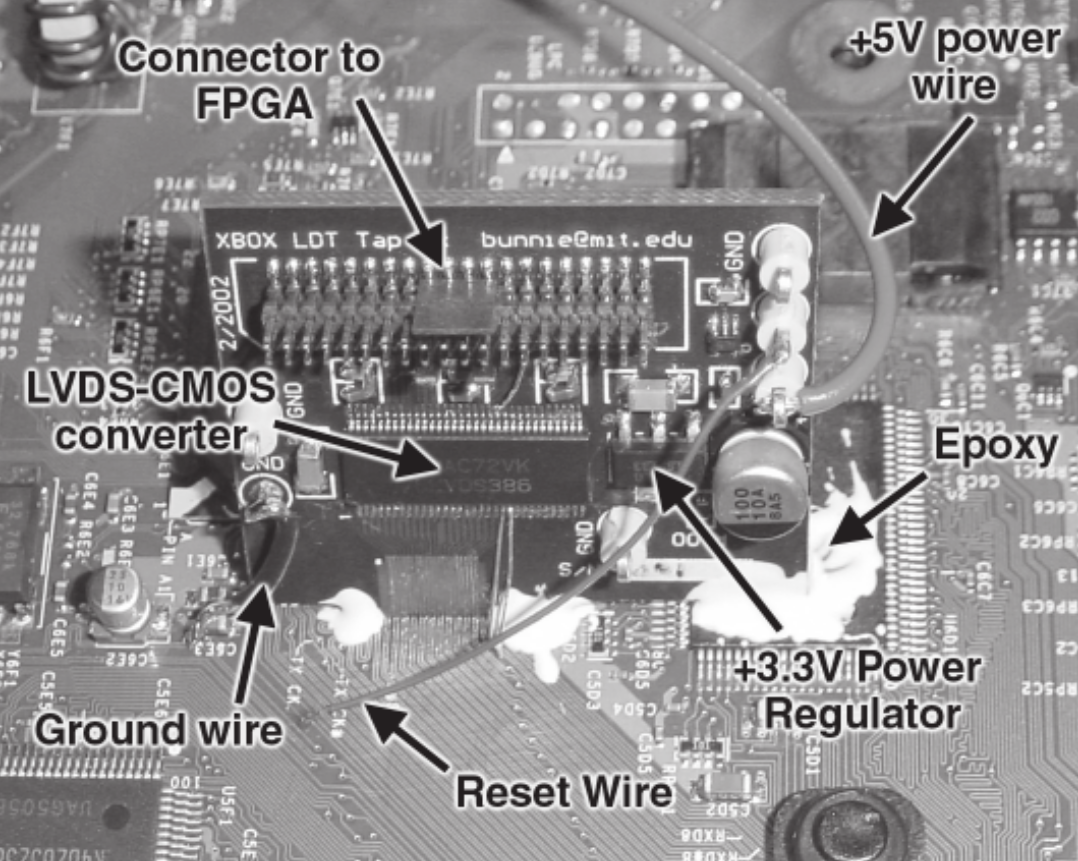
The conclusion is that the protection of the encrypted code/data is as secure as the protection of the key to decrypt it!
So one challenge that encryption brings is key storage.
Key storage techniques
On a desktop or smartphone, the key used to encrypt the filesystem could be derived from a user password (passphrase) entered interactively. That’s how it works on Android smartphones for example.
On an embedded system, usually we don’t have user interaction to derive the key from a password every time we boot the device. So the key should be stored encrypted in the filesystem or in secure storage. And we need hardware support for that.
For example, NXP i.MX processors have a unique master key (pre-programmed by NXP) that can only be accessed by a special hardware module called CAAM (Cryptographic Accelerator and Assurance Module). This hardware device could be used to encrypt the key and store it in the filesystem (this would have to be done during manufacturing). And during boot, the CAMM module would be used to decrypt the key and restore the plain key that would be used to decrypt the filesystem. Since the key inside the CAAM module is not accessible, the encrypted key is protected.
If you don’t have security features available in the processor, you could achieve the same results with an external hardware like a Secure Element or a TPM device. These external devices usually provide secure storage, so they could be used to store a master key that could be used to encrypt/decrypt the filesystem encryption key. These devices also offer a lot of security features like random number generation, hash calculation, crypto and signing functions, etc.
A Secure Element is a secure computing system. It is basically secure storage with its own secure applications (usually implemented using Java Card, but not necessary). What a secure element does is very open and depends on the implementation, but most of them implement the Public-Key Cryptography Standard 11 (PKCS#11). Examples of Secure Elements are smart-cards and SIM-cards.
A TPM (Trusted Platform Module) is a specification and an international standard (ISO/IEC 11889). TPM is not a Secure Element, although it could be implemented inside one. It can be implemented in hardware or software, but most implementations are in hardware. It provides a set of limited security features defined by the standard, including secure storage and cryptographic functions.
A third alternative for secure storage would be using a Trusted Execution Environment. A TEE is an environment where the code executed and the data accessed is isolated and protected in terms of confidentiality (no one has access to the data) and integrity (no one can change the code and its behavior). A lot of devices around us make use of a Trusted Execution Environment, including smartphones, set-top-boxes, videogame consoles and Smart TVs. If you want more details about how a TEE works you can read my article “Introduction to Trusted Execution Environment and ARM’s TrustZone”.
In the end, if you care about encryption in your embedded Linux device, you will have to think about key storage and management from the beginning of the project.
Layered security
So far we have talked about secure boot and encryption to improve the security of an embedded Linux device. But that is not enough. We should always think about security in layers, where each layer applies a mitigation technique that builds on top of other layers to improve the security of the device. And combining multiple mitigation techniques makes it harder for an attacker to compromise the device.
Think about it. You can protect your code and data with secure boot and encryption, but if you are running an application with bugs that could be exploited, your assets are still at risk. If an application has attack vectors (user input, configuration files, network communications, etc), a bug could be used to exploit the application. Especially in programs written in memory unsafe languages like C and C++, where bugs like buffer overflows could be used in attacks like stack smashing and format strings.
So there are more mitigation techniques to come. In the second part of this article, we will cover secure coding, static analysis tools, runtime protections, fuzzing tools, permissions and capabilities, Mandatory Access Control, application sandboxing, and many more!
Please email your comments or questions to hello at sergioprado.blog, or sign up the newsletter to receive updates.